Hiển thị các bài đăng có nhãn making flowers. Hiển thị tất cả bài đăng

Thứ Bảy, 1 tháng 10, 2011

Romantic Heart fabric for gifts and decor: sewing tutorial

 Fuxico de coração frente
 Romantic Heart fabric for gifts and decor: sewing tutorial
DIY: gossip from the heart


I went back to show you how gossip heart-shaped mold using Clover super. This site has a tutorial on how to gossip in the race, but I like the practicality thought best to use atemplate ready, making my life. The mold is on sale in shops patchwork good, mine isPaulinia Shop (tel 11 3032-8799 / 3031-1039). But there is another legal option, which is win one of these here in Superziper. Read the end of the post to learn how:) The promotion was CLOSED


1. Separate the mold, retail fabric, needle, thread and small scissors.
2. The mold is composed of two parts the "base" and "cover". With it you will be able to do a gossip about 2, 0 cm. Get to work! Place the fabric on the part of the pattern down,as shown in photo.


3. Close the lid and pressing, leaving the fabric burnt to a crisp in the mold.
4. Go with scissors trimming the edges of the fabric, leaving 0.3 to 0.5 cm margin.


5. Give a "chop" with the scissors within the range that sits on top of the heart.
6. Thread the needle and tie a little knot at the tip. Starting the hole to the left of the mold base, pass the line from the inside out.


7. The little knot the end of the line is in, see?
8. Continue sewing the inside of the holes on the outside of the mold and counter-clockwise. Every point you will sew the edges of the fabric so that they are inside.


9. Attention in time to sew the base, bend the tip of the fabric as shown in photo 10


11. Notice that the last point will override the first point where you started sewing.
12. Carefully remove the fabric from the mold.


13. 're Almost there! Pull the thread carefully and go curling your gossip and adjustingthe format.
14. Give a tight little knot and cut the line left. If you want to decorate the center preach asmall bud, or let the natural beads!

Flower gifts: Edible Centerpiece, The Veggie Bouquet tutorial

edible vegetable bouquet
Most of you have probably seen an edible bouquet before – usually of the fruit or cookie variety – but this particular design is definitely a stand-out!
The edible veggie bouquet pictured above is from Marley Majcher‘s 40th Birthday Party (more details coming soon) and serves as great inspiration for a super-stylish take on this idea… from the choice and arrangement of the veggies to the chic display in a simple glass cylinder vase filled with black lentils.
This would be an impressive addition to the appetizer buffet for everything from parties & showers to Mother’s Day brunch! Here’s another design that features skewered veggies spraying from a melon “basket” garnished with thyme:
edible vegetable bouquet
I’m also loving the idea of doing “mini versions” of edible bouquets for guests in lieu of individual salads – and serving them in small terracotta pots with a side of veggie dip. I’m definitely going to play around with that idea soon… =)
And below is a video I found with some DIY info on creating edible bouquets… You do have to sit through a 30-second ad to get to the video, but once you get to it, there’s some good DIY info in there about 2 types of edible bouquets: one fruit version and one veggie version featuring clever “roses” make from asparagus and radishes.


How to Make Edible Bouquets

Flower gifts: Edible Centerpiece, The Veggie Bouquet tutorial

Craft Project for kids: Paper Globe tutorial

BongBongGiay400x278.jpg 
Simple folded paper circles are glued together to create a fun globe. Decorate with paper globe topiary or make several globes and thread on to a length of embroidery silk or thin wire to make a garland. 
http://images.thriftyfun.com/images/articles45/BongBongGiay400x611.jpg

Supplies:

  • assorted patterned papers
  • glue stick
  • 2 inch circle punch
  • pencil
  • craft knife

Instructions

Cut or punch 20 circles on to the paper. Cut out a triangle from cardstock. Place the triangle pattern in the center of each circle and lightly draw around with a pencil to make the score lines. Score along the lines using the back of the craft knife blade.
BongBongGiay400x297.jpg
Lay the circles flat and gently fold up the flaps. Create top and bottom: With glue stick, glue flaps of 5 pieces together to make a dome. Repeat for globe bottom.
BongBongGiay400x301.jpg
Create middle band: Glue remaining 10 circles together. Glue first piece to last piece to form band.
BongBongGiay400x253.jpg
Glue globe top to globe band. Glue globe bottom to other side of globe band to form ball.
BongBongGiay400x278.jpg
To create paper globe topiary: Cut 3/16 inch hole at center of one paper circle to allow for topiary pole. Paint 3/16 inch dowel with apple green acrylic paint.
Cut floral foam to fit into pot. Insert covered dowel into hole in paper globe. Insert dowel into center of foam. Cover pot with crumpled strips of tissue paper.
Tie ribbon bow around dowel at base of paper globe.
Craft Project for kids: Paper Globe tutorial

Thứ Năm, 29 tháng 9, 2011

Bunny for Easter: PomPom Bunny DIY

This cute easter project is really easy to make and sooooo fun! I’ll show you how:


You will need white yarn, a small and a big PomPom maker, glue, white and pink felt, scissors and plastic eyes (or buttons)
First, start making PomPoms.
A small and a big one. :) Leave a long tail!
Put the smaller PomPom on the bigger one and tie them together
I made simple knots!
Then, cut off the left yarn.
Cut 2 ears from white felt.
And smaller inner ears from pink felt.
Glue the pink inner ears to the white ears.
Then, glue the ears to the bunny’s head.
You might want to use your fingers to make the ears stick.
It’s almost finished xD
Now, take some plastic eyes in an appropriate size.
And glue them to the head.
For the nose, cut a tiny little heart from pink felt.
Glue it to the cutie’s face!
And now, your bunny is finished!

Thứ Tư, 28 tháng 9, 2011

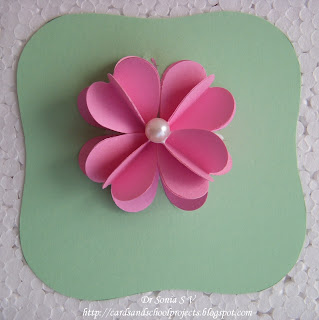
Paper crafts for gifts: Heart Punch 3 D Flower Tutorial


Paper crafts for gifts: Heart Punch 3 D Flower Tutorial
This large 3 D flower is made by sticking hearts together.
Materials required
Hearts 16
Heart Punch
Glue

 1. Fold the hearts in half vertically

Heart Punch Craft Ideas
2. Apply glue to the under- surface of one heart and stick it to 2 other hearts as shown
Heart Punch flower making
3.This is a 3 hearts 3 D heart which pops up and also folds flat .This can be used as such to adorn your cards and other creations for decoration.
Heart Punch Flower Petals
4.Apply glue to the undersurface of one end petal of the above and stick it to another heart.
4 hearts Heart Flower Petal
5. Now you get a "4" hearts petal
Heart Flower Petal Tutorial
6.Make 4 such petals using 16 hearts in all. Using a heart punch makes this a fast job.

Heart Punch Ideas
7. Apply glue on the tip and side edges of the petals made in 5 and 6
Heart Punch Flower Petal
8. Arrange your petals and allow the glue to dry.My favorite glue is white glue which dries transparent.
Heart Flowers

Heart Flowers Tutorial
 9.Put a bead,pearl,quilled shape at the center.
3 D Paper Flower
10.I cut leaves from corrugated paper to complement the flower.Do try these flowers.
Paper Flower Making

Labels

Accessories afghan afghan stitch AGULHAS AMIGURUMI applique Art Árvore de Natal em croche baby crochet Baby Dress baby knitting Baby learn bag Bags BAKTUS Ballet Bun Cover balloons BARRADOS Bead Beads Bear Ear Hat BEBÊS belts Berry blanket BLUSAS BOINA BOLEROS BOLSAS books BORBOLETAS bows boxes bracelet Butterfly CACHECOL CACHECOLAR cake candles candy Candy Cane Cards carving carving fruit carving fruits CASACO INFANTI CASACOS CASAQUINHO EM CROCHE CASAQUINHO EM TRICO CASAQUINHO PARA BEBÊ CHAPEU clay COLAR COLAR DE FLORES COLETE coloring CORDÃO CORUJUINHAS crafts CROCHE COM SAQUINHOS PLASTICOS CROCHE IRLANDES Crochet Crochet Geek crochet pattern cross stitch Curtain cutting paper DECORAÇAO Dicionário de Trico - Inglês/Portugues Doily dress earring ECHARPE Embroidery ENXOVAL PARA BEBÉ ESTOLAS FAIXA PARA CABELOS fashion Felt FLORES Flower flower arrangement flowers crochet Folding paper FOLHAS food food decor FREE FORM frustration Funny Galaxy Stitch garden gel grips gift Gifts glass GOLINHAS Google+ GORRO GRÁFICOS Granny Square hair clip hats Heart Hexagon holiday craft holiday crafts home and garden Hook Itunes jewelery jewelry kirigami Knit knitting knitting pattern knot LEAVES Log Cabin Square LUMINÁRIAS LUVAS LUVINHAS PARA BEBÊ Magazine make up making flower making flowers Making toys Manta MANTA PARA BEBÊ MANTA PARA SOFÁ MEUS MOMENTOS MEUS TRABALHOS mittens motif Multiples Nail art necklace Origami painting PANTUFAS PAP Paper Patchwork PELERINE pictures Pillows plastic POLAINA PONCHO Popcorn puff stitch pumpkin cap QUADRADO Quilling paper Quilt RECEITA RECEITA CULINÁRIA RECEITA DE PONTOS recycle recycling RENDA DE PELO DE CABRA repair work ribbon rings rugs SACOLAS SAIAS DE CROCHE SANDÁLIAS EM CROCHÊ SAPATINHOS SAPATINHOS PARA BEBÊ Scarf scarves sewing shawls shoes and sandals Singing skirt snood Snowflake soap socks SQUARE Strawberry SUÉTER sweater Swiffer Sweeper Cover TABELAS DE MEDIDAS DE TRICO E CROCHE tablecloths TAPETES. RECEITA TENIS PARA BEBÊ Thank you tip tips TOALHAS TOUCAS TOUCAS PARA BEBÊ TRICO TÚNICA tunisian Tutorial Tutorial video underwear Valentine's day VÍDEO video tutorial weaving wedding wood XALE YouTube