Hiển thị các bài đăng có nhãn Cards. Hiển thị tất cả bài đăng

Thứ Năm, 29 tháng 9, 2011

Paper crafts for wedding: FREE TEMPLATE Wedding Card!

  Paper crafts for wedding: FREE TEMPLATE Wedding Card!I made this card for the Late Night Stampers "Bring on the Bling" Challenge! It's hard to see how shiny this is but the dazzling diamonds really sparkle!
As long as I was doing it I figured I would make the template to share with you guys! This is huge for me because that means I had to actually think about what I was doing first instead of just cutting as I go!

CLICK HERE to get the FREE TEMPLATE!

Here are the steps:
I printed out the template and cut the dress out of Bride Specialty Designer Series Paper. I centered the dress shape on the texture in the paper so it would be symmetrical. I cut out the extra pieces of the dress and put them on with a dimensional only at the bottom. I then used a two way glue pen to trace some of the swirls in the paper and add some dazzling diamonds.


I used a piece of 1/4" white grosgrain ribbon with a rhinestone brad in the center for the waist.


For the tux, I cut the outside and tie out of black paper. For the tux shirt I used the other pattern of Bride Specialty Designer Series Paper with the stripes. I used the mini rhinestone brads for buttons.


The card is 4 1/4" x 5 1/4" so the dress and tux shirt can stick up and still fit in the envelope. I had it open in the middle instead of on the side and I put the dress over the opening to hide it. Both the dress and tux I put on with dimensionals.

Thứ Tư, 28 tháng 9, 2011

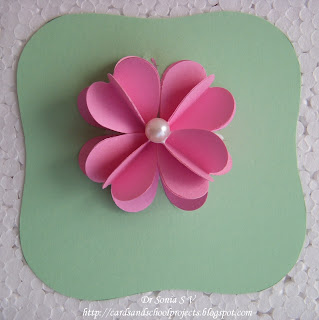
Paper crafts for gifts: Heart Punch 3 D Flower Tutorial


Paper crafts for gifts: Heart Punch 3 D Flower Tutorial
This large 3 D flower is made by sticking hearts together.
Materials required
Hearts 16
Heart Punch
Glue

 1. Fold the hearts in half vertically

Heart Punch Craft Ideas
2. Apply glue to the under- surface of one heart and stick it to 2 other hearts as shown
Heart Punch flower making
3.This is a 3 hearts 3 D heart which pops up and also folds flat .This can be used as such to adorn your cards and other creations for decoration.
Heart Punch Flower Petals
4.Apply glue to the undersurface of one end petal of the above and stick it to another heart.
4 hearts Heart Flower Petal
5. Now you get a "4" hearts petal
Heart Flower Petal Tutorial
6.Make 4 such petals using 16 hearts in all. Using a heart punch makes this a fast job.

Heart Punch Ideas
7. Apply glue on the tip and side edges of the petals made in 5 and 6
Heart Punch Flower Petal
8. Arrange your petals and allow the glue to dry.My favorite glue is white glue which dries transparent.
Heart Flowers

Heart Flowers Tutorial
 9.Put a bead,pearl,quilled shape at the center.
3 D Paper Flower
10.I cut leaves from corrugated paper to complement the flower.Do try these flowers.
Paper Flower Making

Thứ Ba, 27 tháng 9, 2011

Beautiful and easy handmade cards: Stitched Valentine's Cards


It's almost Valentine's Day!

Beautiful and easy handmade cards: Stitched Valentine's Cards
Who wants to make some super cute and easy Valentine's?


I saw these a few years back *I think* in Parents magazine, but, alas, I could not find it on the web to provide a link. I had stored the idea in my memory for a time when my oldest child would be old enough to help. I may have jumped the gun a bit--at 3 1/2 years, she still couldn't quite do it, but we had fun together anyway. And they turned out super cute. I was going to line the insides with scrapbook paper, but she wanted to draw on the insides, so I let her. She had a great time drawing pictures of her relatives and writing her name. :)

So, ready to make some?

Step 1: Gather Supplies

The supplies are pretty basic: yarn, cardstock, a needle big enough to pull the yarn, and a heart (see below for the template I used).


Step 2: Punch holes


Step 3: "Sew" your yarn in


Thứ Tư, 21 tháng 9, 2011

Paper crafts for kids: MAKE YOUR OWN ENVELOPES, origami tutorial

Paper crafts for kids: MAKE YOUR OWN ENVELOPES, origami tutorial

You will need:
An existing envelope, (any shape and size you wish).
Your favourite HB pencil
Coloured card, (you could have each one a different colour if you like).
An inlay sheet, printed from the downloadable template
Spray glue, double-sided tape and scissors.
Step 1: Firstly gently undo the glued sides of an existing envelope, careful not to tear them and cause too much damage. Lay the template flat on to some coloured card of your choosing and trace around the shape with a  pencil then cut out.
Step 2 + Step 3:
Carefully fold in the bottom and two side corner flaps of your new envelope to give it the basic shape. Leave the top one flat as this will be easier to trace when placed onto your inlay paper. With a pencil trace around your envelope shell onto your downloaded inlay paper and cutout. You will now have the exact size of the outer side of the envelope. This is not ideal as it will be too snug when the sides of the envelope are folded in so the inlay needs to be trimmed.
Step 4:
With a pencil and ruler mark about a 3 mm border from the edge at small increments all the way around the inlay. Then with a pair of scissors carefully follow the guide you have made and cut off the 3mm border.   Trim any rounded corners to neaten.
Step 5:
Place the inlay against the base of the envelope and check if you are happy with the size and border/rim shown by the envelope. Spray glue and return to the envelope, centering the inlay by lining it up with the bottom fold of the envelope. For a smooth and solid finish run your hand over it to eliminate any bubbles that could appear left between the inlay and the envelope.
Step 6:
Gently fold all the sides of the envelope back together again including the top flap and make sure you get a clear, crisp fold on all the edges. Use your double-sided tape to stick town the sides with the bottom flap.
Step 7:
With some white ink and a calligraphy pen, write your desired address and adorn with some pretty stamps and whatever else you like and it’s ready to go.
Cute aren’t they?!  I love how you could really personalise the liner to match your day!  How about using old comic book pages for a quirky retro wedding? Or maps for a travel themed celebration?  You could use old book or newspaper pages for a literary-inspired invite, or if you’re not worried about fraying edges how about trying it out with fabric?  What would you use to match your wedding?!

Unique cards for kids: Printable Monkey Tags and cards


etiqueta 01   
Unique cards for kids: Printable Monkey Tags and cards

etiqueta 02
Paper crafts monkey garland  for holiday and birthday for kids

tags 03
Add an Imagemonkey tags para imprimir
Just save the inage as with the right button of your mouse to your computer

Thứ Năm, 15 tháng 9, 2011

Simple quilling card tutorial


Simple Flower Card Tutorial

 
If you've been thinking you might like to give paper filigree a try, but haven't known quite where to start, this is the tutorial for you! click card for close-up view

Trust me, quilling, as filigree is also known, is really quite easy and relaxing to do once you know a few basics. People are sometimes reluctant to try, thinking that working with small strips of paper would have to be super-complicated. Not true at all - it's just a matter of rolling coils and then pinching them to create a variety of interesting shapes.

So are you with me? I hope so!
Let's get started:

Supplies

Cardblank - use a purchased card or make your own by folding a 9 inch x 6 inch piece of cardstock in half to make a card that measures 4.5 x 6. You'll get a very good result by using a scoring blade to mark the fold line and then a bone folder to burnish a sharp crease, but if you don't have these tools, your thumbnail will do a fine job too.

Note: The card is made with a pearlized rose duotone cardstock; the two colors add interest the way the circles are folded back to reveal the second shade. Obtain a similar effect by using any two-sided paper - patterned scrapbook paper would be great, for example. Just cut the circles and use a glue stick or double-stick tape to glue the paper to a card made of plain cardstock.

Quilling paper
rose - 1/8 inch width
silver-gilded ivory - 1/8 inch width, online suppliers sell gilded paper or gild your own with a Krylon leafing pen. Pressing a rolled coil into a silver stamp pad also works.

Quilling tool - either a needle tool or slotted tool - more about this choice later

Circle template - a Coluzzle template would be ideal, but alas, they've been discontinued, put to rest by the many die cutting systems on the market. If you don't happen to have one in your crafty stash, create the same effect by doing things the old fashioned way... use four round objects of descending sizes - measuring cups, for example - and a craft knife to cut halfway around each one to create two circles. Fold each circle back on itself to create the layered effect.

Glue - any kind that's suitable for paper
Scissors
Ruler
Tweezers
Paper piercing tool or T pin - to apply glue
Glass head pins
Plastic lid - to use as a glue palette
Non-stick workboard - cork or Styrofoam - something into which you can stick pins
Damp cloth - to keep fingers free of glue

So... that's it; very few supplies and all are inexpensive. Cool!

Choose a quilling tool: there are two types - a slotted tool or a needle tool The needle tool is a bit tricky to learn to use, but the payoff is a coil with no center crimp. The slotted tool is a cinch, but the end result is a little tab in the center of each coil - this is no problem as long as you ignore quilling purists who frown on the crimp. Ahem... I know this because I used to be a purist. I've since made crimp-peace by using an ultra-fine slotted tool; my fingers thank me and the crimp is so tiny it's barely noticeable.

Practice a bit first; you'll soon be used to the amount of tension needed to roll even coils. Cut 1/8 inch wide strips of computer paper with a paper trimmer to use for practice. If 1/8 inch sounds scary, keep in mind that some quillers prefer to work with 1/16 strips or even narrower - not kidding!

To roll a coil with a needle tool: dampen fingertips and curve one end of a paper strip across the needle. Use the thumb and index finger of whichever hand is most comfortable to roll the paper around the needle. Use even pressure and be sure to roll the paper, not the tool. example: needle tool

When the end of the strip is reached, allow the coil to relax, slide it off the tool, and glue the end. The relaxed roll is called a loose coil.To roll a coil with a slotted tool: slide the strip end into the slot; turn the tool with one hand while evenly guiding the strip with the other hand.
How easy is that?! Complete the coil the same as with the needle tool.example: slotted tool

Make the quilled flower:

teardrop (petal) - rose, 7 inches (make 11)
loose coil (flower center) - silver-gilded ivory, 7 inches (make 1)
shaped teardrop (leaf) - silver-gilded ivory, 9 inches (make 2)

To make a teardrop (petal), pinch the join spot of a round, loose coil to make a sharp point.To make a shaped teardrop, curve point gently.Assemble the flower on a workboard; my favorite is a Styrofoam meat tray from the grocery store. Put a dab of glue on a plastic lid and then dip into it with the tip of a paper piercing tool or a T pin; this gives just the right amount of control. The main thing is to not use too much glue; none should show on your finished project.

Start the flower shape by gluing the pointed end of a petal to the side edge of the flower center. For ease, use tweezers to handle the small parts. Continue gluing petals evenly around the center. Before the glue hardens, prop several of the petals up on pin heads. Leave in position until dry; this will give a natural look to the flower. Add a shaped teardrop to each side of the flower, gluing the rounded ends under a couple of the petals that are raised.Hold the finished flower with tweezers and dip the underside in glue; place on card.
Source: allthingspaper.net

Chủ Nhật, 11 tháng 9, 2011

Handmade cards, DIAGONAL - paper and pen progressions


Handmade cards, DIAGONAL - paper and pen progressions


Paper is one of my favorite things! Make a few simple parallel cuts and then fold each of the sections the opposite way and you get a neat little design.


And who can resist doing a bit of pattern drawing? I can't!

Then I turned it the other way around since I like that 'word search' look, too...

Ahh, an amusing way to play around with this month's theme. Not very practical, but patterns are always entertaining in my opinion!


P.S. these are actually easy to do. (I can imagine your older boys liking this, Dora.) Take a paper, fold it in half, make your series of cuts (starting from the far left make 2 the same length, then each next one progressively shorter by 1 cm until the middle, then progress back to the longest length, again cutting 2 of that one). Open out your paper and make mountain folds in the middle of each strip that you cut and valley folds at each end. Voilá!

Labels

Accessories afghan afghan stitch AGULHAS AMIGURUMI applique Art Árvore de Natal em croche baby crochet Baby Dress baby knitting Baby learn bag Bags BAKTUS Ballet Bun Cover balloons BARRADOS Bead Beads Bear Ear Hat BEBÊS belts Berry blanket BLUSAS BOINA BOLEROS BOLSAS books BORBOLETAS bows boxes bracelet Butterfly CACHECOL CACHECOLAR cake candles candy Candy Cane Cards carving carving fruit carving fruits CASACO INFANTI CASACOS CASAQUINHO EM CROCHE CASAQUINHO EM TRICO CASAQUINHO PARA BEBÊ CHAPEU clay COLAR COLAR DE FLORES COLETE coloring CORDÃO CORUJUINHAS crafts CROCHE COM SAQUINHOS PLASTICOS CROCHE IRLANDES Crochet Crochet Geek crochet pattern cross stitch Curtain cutting paper DECORAÇAO Dicionário de Trico - Inglês/Portugues Doily dress earring ECHARPE Embroidery ENXOVAL PARA BEBÉ ESTOLAS FAIXA PARA CABELOS fashion Felt FLORES Flower flower arrangement flowers crochet Folding paper FOLHAS food food decor FREE FORM frustration Funny Galaxy Stitch garden gel grips gift Gifts glass GOLINHAS Google+ GORRO GRÁFICOS Granny Square hair clip hats Heart Hexagon holiday craft holiday crafts home and garden Hook Itunes jewelery jewelry kirigami Knit knitting knitting pattern knot LEAVES Log Cabin Square LUMINÁRIAS LUVAS LUVINHAS PARA BEBÊ Magazine make up making flower making flowers Making toys Manta MANTA PARA BEBÊ MANTA PARA SOFÁ MEUS MOMENTOS MEUS TRABALHOS mittens motif Multiples Nail art necklace Origami painting PANTUFAS PAP Paper Patchwork PELERINE pictures Pillows plastic POLAINA PONCHO Popcorn puff stitch pumpkin cap QUADRADO Quilling paper Quilt RECEITA RECEITA CULINÁRIA RECEITA DE PONTOS recycle recycling RENDA DE PELO DE CABRA repair work ribbon rings rugs SACOLAS SAIAS DE CROCHE SANDÁLIAS EM CROCHÊ SAPATINHOS SAPATINHOS PARA BEBÊ Scarf scarves sewing shawls shoes and sandals Singing skirt snood Snowflake soap socks SQUARE Strawberry SUÉTER sweater Swiffer Sweeper Cover TABELAS DE MEDIDAS DE TRICO E CROCHE tablecloths TAPETES. RECEITA TENIS PARA BEBÊ Thank you tip tips TOALHAS TOUCAS TOUCAS PARA BEBÊ TRICO TÚNICA tunisian Tutorial Tutorial video underwear Valentine's day VÍDEO video tutorial weaving wedding wood XALE YouTube